Sunday, January 25, 2009

Little Green Doll


I just finished another little spirit doll. She doesn't have a name yet, but she looks like spring to me. She is 5.5 inches tall and 3.75 inches from fingertip to fingertip. (Truth in advertising: She has no fingers.) The beads are a mishmash selection of all the yellow-green beads I have. (More truth: most of the yellow-green beads. I have some yellow-green colored beads I didn't use.) I used a leaf charm for her heart because the colors of the beads reminded me of new leaves.

Like the other spirit dolls I made, I beaded the front, whip stitched the back to the front, stuffed it, and edged it with a beaded picot stitch. The hair is a picot stitch with extensions. You can't see it in the photo, but the end bead in each strand (?) of hair is a slightly lighter and yellower color of green.

One of the tricky parts in making these dolls is stuffing them. I've seen (doll not turkey) stuffing forks on the internet, but I don't have one. So I decided to make my own. I placed two bamboo skewers side by side and taped them together with masking tape, starting just below the points--where the sharpening ended. The two skewer points formed the tines on the fork. This worked amazingly well. It was so much easier to push the fiberfill up into the doll's head and arms with my skewer fork than it was with a finger or a chopstick. The tines held the fiberfill until it got into the tight places. Now I know why there is a commercial market for doll stuffing forks.

This is the back of the doll. I stamped on the fabric with Lumiere gold and green paints just to add a little interest. It looks kind of blue-green in the picture, but it really is green leaning toward olive.


She is now hanging on a little ornament stand that I found at JoAnn's. It was half off the already reduced price, or fifty cents. I bought five of them. Only four more dolls to make!

Thursday, January 22, 2009

It's Not What I Expected: Life Lessons From Improvisational Bead Embroidery


January. It's not at all what I anticipated. Of course, I didn't get off to a good start. I had quite a few other projects going on so I delayed. And then, I didn't know what to do. More delays. I started a couple of new projects. Even more delays. But it nagged at me, peeking out of the bead boxes, following me from room to room, waylaying me in the bead shop.

What to do for the January BJP? With the start of a new year, there is an internal push for something momentous. A fresh start. A different approach. An entirely new challenge. A beading resolution. A beading revolution!

But none of my ideas seemed worthwhile. I finally decided to see what I could do with an even more limited palette than I had used before. In addition, it would be a dull pallete. Nothing dramatic or flashy. A sort of, “What can you do with not much?” It was a challenge that matched my state of mind. So these are the beads I picked.


The first step was to paint my Stiff Stuff. After carefully (if not accurately) analyzing the color of my selected beads, I decided that purple, with just a little red and a fair amount of white and black, would give the desired color. Down I went into the dark and cold laboratory. Purple, a little red, white, black, more white, more purple, and then the Stiff Stuff. The next day I looked at it. Whoa! Fuschia! Not what I anticipated!


Should I get another piece and paint it? More delays while cheapness, er, frugality,er, careful use of resources argued with the vision in my head. I decided to go with the Stiff Stuff I had painted. Then it was back to the bead box for a new selection of beads. They were not what I anticipated using.

I beaded a few rows and I was surprised. Again, not what I anticipated. Rip some out, and back to the bead box. No, those other beads wouldn't work either.

Now in the greater scheme of things, improvisational bead embroidery is lesser. The stakes are small. It doesn't bring world peace, reverse global warming, or cure disease. It doesn't even vacuum or wash the kitchen floor.

But I believe it can teach us life lessons. By its nature, there is uncertainty in improvisation. Learning to respond to to uncertainty and the unexpected with adaptation, modification, active problem solving, and even enjoyment can help us develop resilience. And, goodness knows, we all need resilience.

My January piece has become a reflection on responses to the unanticipated and the importance of resilience. This, I believe, is a worthy theme for the beginning of a new year. The more difficult part will be applying this reflection to larger and more important unanticipated issues.


Technical Details:

As described above, the foundation is Lacy's Stiff Stuff painted with Dye-Na-Flow.

As usual, most of the beads are 11/0s, with some 15/0s, 8/0s, and 6/0s. There are hex beads, triangles, two sizes of bugles, and some fringe beads.

The backstitch remains my basic stitch.

This page is 2.75 inches by 2.75 inches.

This time, I used taupe C-Lon thread.

What I Was Thinking:

In addition to what I wrote above, I was thinking a lot about Pam T and her amazingly resilient response to a difficult situation. I admire her greatly.

Issues that Came Up:
  • How did I get so many dull colored beads (that I didn't use in this page)?
  • I am quite satisfied with the size.
  • I like Nymo thread better than C-Lon.
If you are interested in reading about resilience, I recommend The Power of Resilience by Robert Brooks and Sam Goldstein. I had the pleasure of hearing Dr. Brooks at the Midwest Brain and Learning Institute a few years ago. It was a great experience!

Sunday, January 18, 2009

Little Pinky Deere


Let me introduce you to Little Pinky Deere. She is a doll I made for a swap, so like all the other dolls I have made she will be moving on to a new home. But isn't that what parenting is all about? You do your best to bead them and you send them out into the wider world.

Little Pinky Deere is three inches tall. Her face is one of the cabs I made with air-dry clay. It has two coats of paint. I can't remember what the first coat was, but the second coat was Jacquard Lumiere Halo Pink Gold. It is sealed with a craft polyurethane. The face cab is held on with beads, not glue. She has a ribbon on the top so she can be hung up.

This is the back. First I beaded the front, then I whip stitched the front to the back, leaving an opening for stuffing. I had to push the stuffing through the neck with a bamboo skewer. After stitching the hole closed, I edged Pinky with a picot stitch. To give her hair, I used a picot variation. Then I decided to try to bead on the back with a curved beading needle. It's just about as tricky as I thought it would be. More practice with the curved needle is definitely needed.


Little Pinky Deere lives in this bag when she is not on duty sharing the love. It is made of a poly satin and it is lined with the same fabric. The color is not as purple as it shows in the photo. I received the fabric as a sort of challenge Christmas gift. The giftor reported that it was the first cut off the bolt, and she wondered what I would do with it. So here it is.


I know you've been wondering about the name, Little Pinky Deere. No it is not a spelling issue. Her last name comes from her special home. See the back of the bag below.


And some people wondered why this was the first cut off the bolt!

Thursday, January 15, 2009

Hip Fluff, A Vintage Zipper, Music to Sew By, and Other Amusements for a Snow Day, None of Which Involve Touching a Vacuum Cleaner


Part I: The Snow Day
I called a snow day today. The weather reports last night said snow, wind, and single-digit temps. It was snowing like crazy when we went to bed. So I didn't set my alarm to get up in time for my exercise class. When I got up (at the time my alarm would have gone off), it was again snowing like crazy. I was quite surprised that our local schools were not closed, although the district immediately to the south was closed. The morning newspaper was not delivered. So I called a snow day. I put on my football pants and an old sweatshirt. No exercise class for me.

Part II: The Black Corduroy Slacks, Including a Discussion of Hip Fluff and Fun with a Vintage Zipper
Yesterday afternoon I cut out and started sewing a pair of black corduroy slacks. I made some pattern alterations so they would fit my new svelte self. The main alteration was in the high hip area. Before I started taking Zumba Gold last summer, I suffered from hip fluff. That's the soft, pudgy area immediately below the waist. My previous perfect fit pants pattern had some elastic added to the waistband. That helped ease in the fabric needed to accommodate the hip fluff. Now that my hip fluff has diminished, I wanted to take out some of the extra fabric for a smoother fit. I enlarged the darts at the waist and took in the side seams at the waist.

Now for the zipper: When I was unable to find a black 9-inch zipper in my zipper box yesterday afternoon, I contemplated a quick trip to the fabric store. But the weather was nasty then, too. Luckily, in addition to the vintage needles (yesterday's post), I found a black dress zipper in the drawer. This is a zipper that is closed at both ends so it can be inserted in the side seam of a fitted dress like the ones Beaver Cleaver's mother wore in the 1950s. I don't think they make this kind of zipper anymore. I wish I had taken a picture before I put it in the slacks because some of you may not have seen one before. Obviously, the top of the zipper needed to be cut off so it could open all the way. Otherwise, I wouldn't be able to get into the pants. This process has two major opportunities for disaster. First, cutting off the top while it is zipped up. OOPS! There goes the zipper pull. Second, zipping up the zipper after the top has been cut off. OOPS! There goes the zipper pull. Please do not ask how I know these things. Anyway, I got the zipper in without incident. The slacks are pretty much finished. Now I've got all these little black corduroy nerds (fuzz) all over the house. I just track them from one place to another. No sense getting out the vacuum cleaner until I hem the pants, though.


Part III: Music to Sew By
I bought myself a new CD before Christmas. This brings my grand total of CDs to 11--or maybe 12 since it's a two-CD set. It's Elton John's Greatest Hits. This is great music to sew by. I just keep sewing and sewing and sewing. And when I stand up and wait for the iron to heat up, I find myself dancing! Crocodile Rock--I mean, how can you not dance? These Elton John CDs are somewhat louder than my other sewing music, James Taylor, Norah Jones, Eric Clapton. Ok, Hair can get a little loud. I'll need to be careful that I don't deafen myself. Now what does this collection of music say about me? Don't answer that if it's not good!

Part IV: Amusements for a Snow Day
Some people think that the most fun thing to do on a snow day is to deconstruct a broken computer. Those people would not include me. But in case it includes you, I give you the photo of the non-functional motherboard that made its appearance on our dining table this afternoon. Some people are pretty excited when they get it out without busting anything (Did I say the computer was broken and the motherboard was non-functional?) so they can send it in someplace for a repair estimate. Pretty darn cool, or something...


Other people (that would include me) like to have plenty of reading material available for a snow day. We have a great public library, and this is what they're letting me use this week. There is actually another one on the shelf that I neglected to put in the picture. I really need this many books. After all, I'm the one that takes three books on a flight--my book, my security book (in case I finish my book or it's no good), and my auxilary security book (same thing).


Tomorrow, it's exercise class. If we don't get snowed in.

Wednesday, January 14, 2009

Amazing Old Needle Packages!


In my futile search for a nine-inch black zipper this afternoon, I found these wonderful packages of needles in my zipper box. The Colonial Needles (above) are the Best Sheffield Steel.

The Woolco Darners (below) represent perfection in the art of needle making.


A real deal: On sale for twelve cents! Do the math. It's 20% off!


Another wonderful package.


These self-threading needles are the only ones made in Germany.


And these Queen Royal needles are made in Czechoslovakia.


And I am going to ask for Elephant Brand Hatpins!


I wish I knew exactly where they came from. I think they must have been in my mother's sewing stuff. Or maybe they came from my grandmother...

Saturday, January 10, 2009

Face Cabs

Since I've been playing around with some beaded art dolls (here and here), I decided to try making some face cabs to use with the dolls.

I used a mold because my talent in sculpting is at the elementary school level. Some of the faces are made with Creative Paperclay and some are made with Craft Porcelain.

Following the instructions on the mold, I dusted it with baby powder before pushing the clay in. The faces came out pretty well, considering that this was my first attempt. Another thing to use as a release is cornstarch. I'll try that next.

One issue I had was having the faces come out somewhat distorted in shape. I found that I could smush the face around a little to limit the distortion and, perhaps, to add artistic distinction. I let the faces dry 24 hours on a piece of waxed paper and then turned them face down to dry for another 24 hours.

When the faces were completely dry, I used sandpaper to smooth out some of the Paperclay faces. I learned I needed to be gentle--it sands very easily. I didn't try to sand the ones made of Craft Porcelain.

The next step was painting. I tried a variety of paints, and Lumiere was my favorite by far. It went on very, very smoothly and it covered very well. My second favorite was PRObrite paint. It is thicker than the Lumiere, and it covered very well. I put a second coat of a different color of paint on the faces the next day. In some cases, I rubbed a little of the wet second coat off to show the color underneath. To seal the face cabs, I used a water-based craft polyurethane on the front and the back.

I was surprised at how light these face cabs were. Right now I'm using one (not shown in the photo) on a little pink doll. It's quite easy to work with, and I'll continue to try to improve my technique.

Friday, January 9, 2009

Flannel Lined Corduroy Slacks


It's cold and snowy out. And it's going to get colder and snowier next week. The coldest week of the winter is predicted, with highs in the low teens. Ok, so this may not be all that cold if you're from northern Minnesota, Alaska, Siberia, or even Michigan's Upper Peninsula. I will admit to being a weather wimp.

We keep our house at an occasionally toasty 67 during the day and a bracing 57 at night. Warm clothes are in order. And they work well if you keep moving. But sometimes it can get cold if you are just sitting still.

I decided I needed some warmer pants. I have a pair of wonderful flannel-lined jeans from LLBean. We refer to them as my football pants. Perhaps you get the idea. Not too glamorous. And the pockets on the back emphasize The Part of My Body Most Unfortunately Affected By Gravity.

Now in regard to The Part of My Body Most Unfortunately Affected By Gravity, there is good news. I've been taking Zumba Gold since last summer. My perfect fit pants pattern, developed through numerous convoluted sets of alterations three years ago, no longer is perfect. For a start, the rise is now too long. (Think butt lift. Or don't, if you're squeamish or perhaps merely refined.) And the outer thigh area is a little baggy. (Smaller saddlebags.)

Flannel-lined corduroy slacks (with no back pockets) would be a little dressier (the Midwest version of business casual) and perhaps I could avoid any undesirable backside attention. I decided to use my perfect fit pants pattern to make them. The first question was what to do about the fit. With the added layer of flannel, the pants would need to be a little roomier than usual. So I decided to make no alterations at this time and to adjust the rise before I put the waistband on.

The second question was how to attach the flannel lining to the pants. The LLBean jeans are made with the flannel attached with an underlining method. The flannel piece is attached to the corresponding denim piece before the garment is assembled. Then the flannel-lined denim piece is treated as a single piece--the same way you would if there were no flannel lining. This makes for lots of extra sewing to attach the flannel to the denim. Lots of extra sewing for pants to be thrown in the washer and dryer with who knows what else. So I decided to use the same method I use for lining wool slacks--make the slacks, make the lining, and sew them together at the waistline and the leg hem.

The third question was what to use for the lining. I already had the navy blue corduroy, but I needed some flannel. And guess what! Down in the Fabric Storage Cave was some flannel. Vintage? Retro? Old? Yeah. Old. It was a lovely, delicate blue and white print. It wasn't exactly what I'd choose, but it was available and the price was right. After all, who would see it? The person who does the laundry? (That's me waving at you.) An ER nurse cutting the pants off my weakened body? Tacky-looking pants lining would be the least of my worries in that situation. And I promise I'll have on clean underwear. (At least it would have been clean until the unexpected occurance that culminated in an ER visit.)

So I made the pants and the lining, stitched them together at the waistline and shortened the rise as I put the waistband on. Ooooh! Cozy! The seams are zigzagged together and trimmed to limit bulk. I finished the inside of the waistband edge with Seams Great so I wouldn't have to fold it up. Then I stitched in the ditch from the outside to sew it down. To make it even easier, I hemmed the pants by machine.

Next week, I'll see if the new flannel-lined corduroy slacks keep me very, very warm. Now I need to vacuum up all those little navy blue corduroy fuzzies that are all over the house.

Monday, January 5, 2009

Christmas Secrets Revealed!

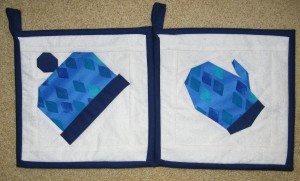
It is time to reveal some of the Christmas secrets. Here are some very cute pot holders Nancy made for all of us.

Mine are blue and Rebecca’s are red. I don’t know what other colors were used. Perhaps Nancy will post about her process of combining two sets of instructions.

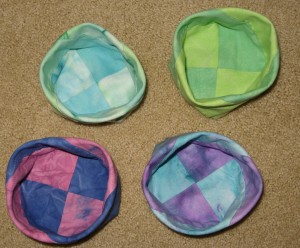
Here are some thread catchers I made for the other crackpots. From the side:

From the top:

The thread catchers can sit on your sewing machine table, and you can put all the snips and ends of thread in them to save for another occasion (or to keep them out of the vacuum cleaner). Or you can fill them with chocolate. They are made from some of the hand painted fabric I made during the summer.

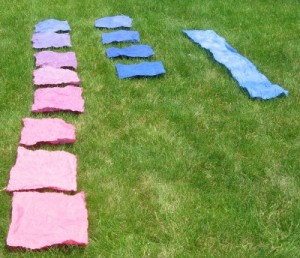
Aha! At last an answer to the question about the fabric, “What is it for?”

You can read more about my fabric painting adventures here.

I found the pattern here. Thanks, Leanne!

Thursday, January 1, 2009

What A Four and 11/12-Year-Old Thinks

At Thanksgiving, my 4 and 11/12-year-old grandson very helpfully offered to name my beading. He thought that the November BJP (above), which I called Blue Abundance, should be Splashing in the Water. He's right, the texture does look like splashing.

He thought that the September page, which I considered to be Amber and Sand Dunes, should be either Sand Dunes at Goshorn Lake or Sand on Sandpaper. The extended family all-together week is centered at Goshorn Lake. And he was intrigued by the texture of the Stiff Stuff backing that reminded him of sandpaper.

My personal favorite of his suggestions was for the October BJP, which I called Not-Quite-Pink. His idea came as soon as he saw it. Piggy! How can you go wrong with Piggy?

And for those who were wondering, he was the one counting the days until his birthday. He insisted he was no longer four. He was four and 11/12. Precision in names and precision in numbers. That's him!

December BJP Completed!


The Longest Night of the Year Sparkles!

I finished my December BJP while we were visiting the World Center of Football for Christmas. The 6 3/4-year-old football player was interested in the different shapes of the beads. The now five-year-old football player again had a suggestion for the name: Waves. (For more of his suggestions see post above.)

But I think I'll stick with the wordier The Longest Night of the Year Sparkles! The title may be a little misleading as it was snowing, raining, or about to snow or rain nearly all of December. I think we had one day of sun.

Technical Details:

Again I used Lacy's Stiff Stuff as a foundation. To get a blue-toned dark color, I painted it with blue, black and purple Dye-na-Flow.

The beads are the usual mishmash of 11/0s, Delicas, 8/0s, and 15/0s. There are some hexes, large and small cubes, large triangles, a donut, and some nameless shapes. I found some long bugles to use as well. The colors are all variations of navy blue. Some lean toward the purple and some lean toward the green. Many are AB or iris. There are a few muted gold beads, too. Quite a few of the beads were from packages of mixed beads. They were the darkest ones in the groups. It's more fun than a reasonable person would think to sort through those packages.

Most of the page was done with the backstitch. I continue to find this the most comfortable stitch for me. I attached the donut in a way new for me. Look for it just left of the middle of the piece. I used four strings of 15/0s from the center of the donut to the outside.

The page is 2.75 inches by 2.75 inches.

I used navy blue Nymo thread.

What I Was Thinking:

I enjoy December. To me, it means getting together with the extended family for Christmas. We're a pretty laid-back, whatever happens happens crowd, and no one seems to get stressed out by trying to maintain a particular tradition. When the days are short and the nights are long, we see the sparkles.

Issues that Came Up:
  • The 2.75 inches by 2.75 inches size is probably just right.
  • Although I often think of all the other stuff I would like to add to the little pieces, I'm glad I don't feel pressured by the BJP. I have several (lots?) of other projects in progress.
  • I was surprised by the variation within this limited color palatte.
  • I'd like to do a similar dark piece, starting either from purple or from green. Maybe a doll...
Happy New Year!